Using images
Summary
One of the more fun features of the canvas is the ability to use images. These can be used to do dynamic photo compositing or used as backdrops of graphs etc. External images can be used in any format supported by the browser (e.g. PNG, GIF or JPEG format). Other canvas elements on the same page can also be used as the source.
Importing images
Importing images is basically a two step process:
- Firstly we need a reference to a JavaScript Image object or other canvas element as a source. It isn’t possible to use images by simply providing a URL/path to them.
- Secondly we draw the image on the canvas using the
drawImagefunction.
Let’s look at step one first. There are basically four options available:
Using images which are on the same page
We can access all images on a page by using either the document.images collection, the document.getElementsByTagName method, or if we know the ID attribute of the image, the document.getElementById method.
Using images from other domains
Using the crossOrigin attribute on an Image, you can request permission to load an image from another domain for use in your call to drawImage(). If the hosting domain permits cross-domain access to the image, the image can be used in your canvas without tainting it; otherwise using the image will taint the canvas.
Note: Need description for “taint the canvas”
Using other canvas elements
Just as with normal images we access other canvas elements using either the document.getElementsByTagName method or the document.getElementById method. Make sure you’ve drawn something to the source canvas before using it in your target canvas.
One of the more practical uses of this would be to use a second canvas element as a thumbnail view of the other larger canvas.
Creating an image from scratch
Another option is to create new Image objects in our script.
Basically to create a new image object we do this:
var img = new Image();   // Create new img element
img.src = 'myImage.png'; // Set source path
When this script gets executed, the image starts loading. Trying to call drawImage before the image has finished loading will throw in Gecko 1.9.2 and earlier, and silently do nothing in Gecko 2.0 and later. So you must use an onload event handler:
var img = new Image();   // Create new img element
img.onload = function(){
  // execute drawImage statements here
};
img.src = 'myImage.png'; // Set source path
If you’re only using one external image this can be a good approach but once you need to track more than one we need to resort to something more cunning. It’s beyond the scope of this tutorial to look at image preloading tactics but you can check out JavaScript Image Preloader for a complete solution.
Embedding an image via data: url
Another possible way to include images is via the data: url. Data urls allow you to completely define an image as a Base64 encoded string of characters directly in your code. One advantage of data urls is that the resulting image is available immediately without another round trip to the server. (Another advantage is that it is then possible to encapsulate in one file all of your CSS, Javascript, HTML, and images, making it more portable to other locations.) Some disadvantages of this method are that your image is not cached, and for larger images the encoded url can become quite long:
var img_src = 'data:image/gif;base64,R0lGODlhCwALAIAAAAAA3pn/ZiH5BAEAAAEALAAAAAALAAsAAAIUhA+hkcuO4lmNVindo7qyrIXiGBYAOw==';
drawImage
Once we have a reference to our source image object we can use the drawImage method to render it to the canvas. As we we’ll see later the drawImage method is overloaded and has three different variants. In its most basic form it looks like this.
drawImage(image, x, y)
Where image is a reference to our image or canvas object. x and y form the coordinate on the target canvas where our image should be placed.
drawImage example 1
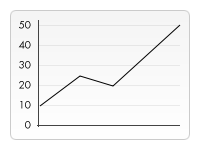
In the following example I will be using an external image as the backdrop of a small line graph. Using backdrops can make your script considerably smaller because we don’t need to draw an elaborate background. I’m only using one image here so I use the image object’s onload event handler to execute the drawing statements. The drawImage method places the backdrop on the coordinate (0,0) which is the top left corner of the canvas.
  function draw() {
    var ctx = document.getElementById('canvas').getContext('2d');
    var img = new Image();
    img.onload = function(){
      ctx.drawImage(img,0,0);
      ctx.beginPath();
      ctx.moveTo(30,96);
      ctx.lineTo(70,66);
      ctx.lineTo(103,76);
      ctx.lineTo(170,15);
      ctx.stroke();
    };
    img.src = 'images/backdrop.png';
  }
Scaling
The second variant of the drawImage method adds two new parameters and it allows us to place scaled images on the canvas.
drawImage(image, x, y, width, height)
Where width and height is the image’s size on the target canvas.
drawImage example 2
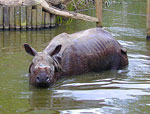
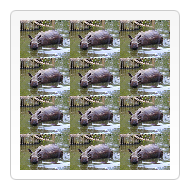
In this example I’m going to use an image as a wallpaper and repeat it several times on the canvas. This is done simply by looping and placing the scaled images at different positions. In the code below the first for loops through the rows the second for loop the columns. The image is scaled one third of its original size which is 50x38 pixels. We’ll see how this could also have been achieved, by creating a custom pattern, later in this tutorial.
Note: Images can become blurry when scaling up or grainy if they’re scaled down too much. Scaling is probably best not done if you’ve got some text in it which needs to remain legible.
  function draw() {
    var ctx = document.getElementById('canvas').getContext('2d');
    var img = new Image();
    img.onload = function(){
      for (var i=0;i<4;i++){
        for (var j=0;j<3;j++){
          ctx.drawImage(img,j*50,i*38,50,38);
        }
      }
    };
    img.src = 'images/rhino.jpg';
  }
Slicing
The third and last variant of the drawImage method has eight new parameters. We can use this method to slice parts of a source image and draw them to the canvas.
drawImage(image, sx, sy, sWidth, sHeight, dx, dy, dWidth, dHeight)
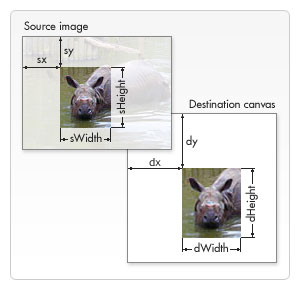
The first parameter image, just as with the other variants, is either a reference to an image object or a reference to a different canvas element. For the other eight parameters it’s best to look at the image on the right. The first four parameters define the location and size of the slice on the source image. The last four parameters define the position and size on the destination canvas.
Slicing can be a useful tool when you want to make compositions. You could have all elements in a single image file and use this method to composite a complete drawing. For instance, if you want to make a chart you could have a PNG image containing all the necessary text in a single file and depending on your data could change the scale of your chart without very much diffculty. Another advantage is that you don’t need to load every image individually.
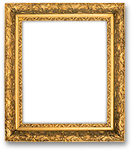
drawImage example 3
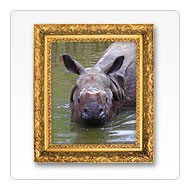
In this example I’m going to use the same rhino as we’ve seen above, but now I’m going to slice its head out and composite it into a picture frame. The image of the picture frame includes a dropshadow which has been saved as a 24-bit PNG image. Because 24-bit PNG images include a full 8-bit alpha channel, unlike GIF and 8-bit PNG images, I can place it onto any background and don’t have to worry about a matte color.
I took a different approach to the loading of the images than the example above. I just placed the images directly in my HTML document and used a CSS rule to hide them from view (display:none). I assigned both images an id attribute to make them easier to select. The script itself is very simple. I first draw the sliced and scaled image on the canvas (first drawImage statement), and then place the frame on top (second drawImage statement).
function draw() {
  var canvas = document.getElementById('canvas');
  var ctx = canvas.getContext('2d');

  // Draw slice
  ctx.drawImage(document.getElementById('source'),
                33,71,104,124,21,20,87,104);

  // Draw frame
  ctx.drawImage(document.getElementById('frame'),0,0);
}
Art gallery example
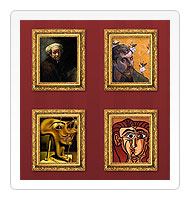
In the final example of this chapter I’ve made a little art gallery. The gallery consists of a table containing several images. When the page is loaded, for each image in the page a canvas element is inserted and a frame is drawn arround it.
In my case, all images have a fixed width and height, and so does the frame that’s drawn around it. You could enhance the script so that it uses the image’s width and height to make the frame fit perfectly around it.
The code below should be self-explanatory. We loop through the images array and add new canvas elements accordingly. Probably the only thing to note, for those not so familar with the DOM, is the use of the insertBefore method. insertBefore is a method of the parent node (a table cell) of the element (the image) before which we want to insert our new node (the canvas element).
function draw() {

  // Loop through all images
  for (var i=0;i<document.images.length;i++){

    // Don't add a canvas for the frame image
    if (document.images[i].getAttribute('id')!='frame'){

      // Create canvas element
      canvas = document.createElement('canvas');
      canvas.setAttribute('width',132);
      canvas.setAttribute('height',150);

      // Insert before the image
      document.images[i].parentNode.insertBefore(canvas,document.images[i]);

      ctx = canvas.getContext('2d');

      // Draw image to canvas
      ctx.drawImage(document.images[i],15,20);

      // Add frame
      ctx.drawImage(document.getElementById('frame'),0,0);
    }
  }
}
Controlling image scaling behavior
Introduced in Gecko 1.9.2 (Firefox 3.6 / Thunderbird 3.1 / Fennec 1.0)
Gecko 1.9.2 introduced the mozImageSmoothingEnabled property to the canvas element; if this Boolean value is false, images won’t be smoothed when scaled. This property is true by default.
ctx.mozImageSmoothingEnabled = false;
Attributions
This article contains content originally from external sources, including ones licensed under the CC-BY-SA license.

Portions of this content copyright 2012 Mozilla Contributors. This article contains work licensed under the Creative Commons Attribution-Sharealike License v2.5 or later. The original work is available at Mozilla Developer Network: Article