Learn to use HTML Lists
Summary
A step by step example to get used with list elements in html.
Step by step example
Let’s run through a step by step example, to put all of this together. Consider the following scenario:
You are creating a small website for the HTML Cooking School. On the main page, you are to show a list of categorised recipes, linking through to recipe pages. Each recipe page lists the ingredients required, notes on those ingredients and the preparation method. The three categories are:
- Cakes (including recipes for Plain Sponge, Chocolate Cake and Apple Tea Cake)
- Biscuits (including recipes for ANZAC Biscuits, Jam Drops and Melting Moments)
- Quickbreads (including recipes for Damper and Scones)
The client doesn’t mind what order the categories and recipes are shown; they just want to be sure people know which items are categories and which ones are recipes.
Let’s step through the process of creating this site.
Main page markup
Create a properly-formed HTML page, including a doctype,
<html>,<head>and<body>elements, and save it as stepbystep-main.html. Add a main heading (<h1>) of “HTML Cooking School”, and a subheading (<h2>) of “Recipes”:<h1>HTML Cooking School</h1> <h2>Recipes</h2>You have three categories of recipe to represent, and the order is not important — an unordered list is most appropriate for these, so add the following to your page:
<h2>Recipes</h2>
 <ul>
   <li>Cakes</li>
   <li>Biscuits</li>
   <li>Quickbreads</li>
 </ul>
Indenting the
<li>elements makes the code more readable, but it is not required.Now you need to add the recipes as sub-items, for example “Plain Sponge”, “Chocolate Cake” and “Apple Tea Cake” are all part of the “Cakes” category. To do this, you need to create a nested list within each item. Since the order is not important, once again unordered lists are appropriate. To make things easier for the tutorial, I’ll get you to link all of the recipes to one single recipe page (html links lets build a web explains HTML links in depth].):
<h2>Recipes</h2>
 <ul>
   <li>Cakes
     <ul>
       <li><a href="stepbystep-recipe.html">Plain Sponge</a></li>
       <li><a href="stepbystep-recipe.html">Chocolate Cake</a></li>
       <li><a href="stepbystep-recipe.html">Apple Tea Cake</a></li>
     </ul>
   </li>
   <li>Biscuits
     <ul>
       <li><a href="stepbystep-recipe.html">ANZAC Biscuits</a></li>
       <li><a href="stepbystep-recipe.html">Jam Drops</a></li>
       <li><a href="stepbystep-recipe.html">Melting Moments</a></li>
     </ul>
   </li>
   <li>Breads/quickbreads
     <ul>
       <li><a href="stepbystep-recipe.html">Damper</a></li>
       <li><a href="stepbystep-recipe.html">Scones</a></li>
     </ul>
   </li>
 </ul>
The final result should be something similar to Figure 1:
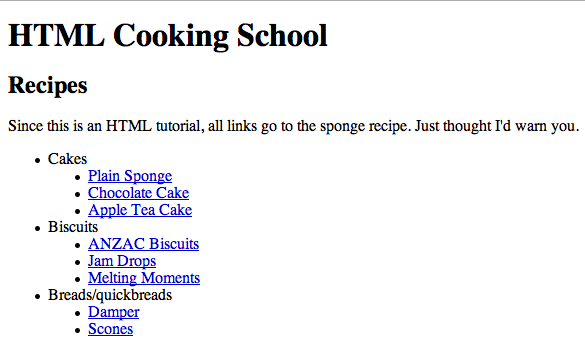
Figure 1: The finished main page.
You can also view the live example page here.
The recipe page
For the sake of the example, we will just create the sponge cake recipe page — feel free to create the others yourself, using this one as a template. The HTML Cooking School has supplied the sponge recipe to you in a text file, looking like this:
Simple Sponge Cake
Ingredients
3 eggs
100g castor sugar
85g self-raising flour

Notes on ingredients:
  Caster Sugar - Finely granulated white sugar.
  Self-raising flour - A pre-mixed combination of flour and leavening agents (usually salt and baking powder).</code>

Method
  1. Preheat the oven to 190°C.
  2. Grease a 20cm round cake pan.
  3. In a medium bowl, whip together the eggs and castor sugar until fluffy.
  4. Fold in flour.
  5. Pour mixture into the prepared pan.
  6. Bake for 20 minutes in the preheated oven, or until the top of the cake springs back when lightly pressed.
  7. Cool in the pan over a wire rack.
Recipe page markup
Create another properly-formed HTML document, and save it as stepbystep-recipe.html. Add the following headings to it:
<h1>Simple Sponge Cake</h1>
 <h2>Ingredients</h2>
 <h3>Notes on ingredients</h3>
 <h2>Method</h2>
The ingredients list has several items but the order isn’t important. An unordered list therefore makes sense. Add the following into the
<body>of your HTML:<h2>Ingredients</h2> <ul> <li>3 eggs</li> <li>100g castor sugar</li> <li>85g self-raising flour</li> </ul>The notes on the ingredients are there to properly define what some of the ingredients are. You need to associate the ingredient — the name — with its value. A description list is right for this purpose. Add the following to your HTML, below the unordered list in the previous step:
<h3>Notes on ingredients</h3>
 <dl>
   <dt>Castor Sugar</dt>
     <dd>Finely granulated white sugar.</dd>
   <dt>Self-raising flour</dt>
     <dd>A pre-mixed combination of flour and leavening agents (usually salt and baking powder).</dd>
 </dl>
The method must obviously follow a single correct order, so it should be an ordered list — add the following to your HTML, below the description list:
<h2>Method</h2>
 <ol>
   <li>Preheat the oven to 190°C.</li>
   <li>Grease a 20cm round cake pan.</li>
   <li>In a medium bowl, whip together the eggs and castor sugar until fluffy.</li>
   <li>Fold in flour.</li>
   <li>Pour mixture into the prepared pan.</li>
   <li>Bake for 20 minutes in the preheated oven, or until the top of the cake springs back when lightly pressed.</li>
   <li>Cool in the pan over a wire rack.</li>
 </ol>
The page should look something like Figure 2:
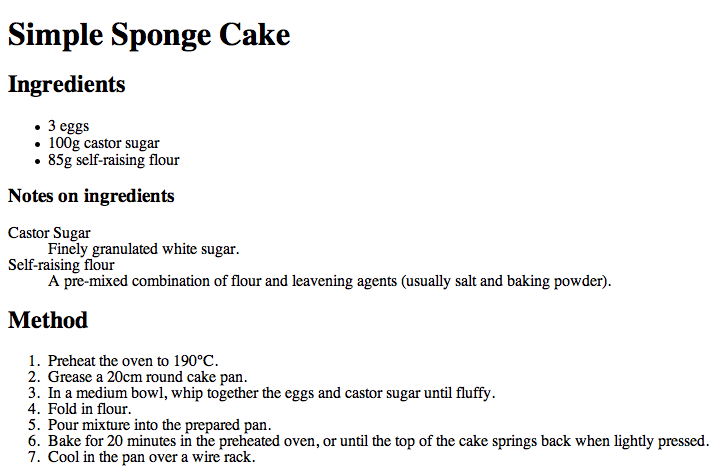
Figure 2: The finished recipe page.
You can also view the live example page here.
You’re done!
Notes
This page needs to be redone and actually broken into a few tutorials which will show different things you can do with lists since there are simply so many.