The HTML <head>
Summary
This article covers the <head> section of HTML documents and some of its most common components. Making sure that all of these are correct will result in your document being fast, and easy to find and understand.
Introduction
This article deals with a part of the HTML document that does not get the attention it deserves: the markup that goes inside the head element. By the end of this tutorial you will have learned about the different parts of this section and what they do, including the title element, keywords and description (which are handled by meta elements), and more. You’ll also learn about JavaScript and CSS styles (both internal and external) and about what not to leave in the head. Make sure you go through the full tutorial from start to finish, as it builds up a series of best practices to follow when dealing with the HTML head.
Head? What head are we talking about?
The body (the <body></body> tags and everything in between) is where you’ll spend most of your time as a web designer or developer, as this is where all the visible content of the document goes. The head (the <head></head> tags and everything in between) plays a seemingly less important role because, with the exception of the title element, nothing you put in this part of the document is directly visible to your site’s visitors. Instead, the head is the place where most of the instructions for the browser are located and where you store extra information, called metadata, about the document.
Setting the document’s primary language
One piece of information about the document actually goes on the parent of the head, the html element. It is here that we define the primary natural language of the document. By natural language, we mean human language, such as French, Thai, or English. This helps screen readers (software that reads out web pages to users with visual impairments); for example, the word “six” exists in both English and French, but is pronounced very differently. It’s a good idea to define the primary language of a document, especially when writing pages for an international audience. It is also becoming increasingly important for correct styling of your page, and it can help with spellchecking and other things. You set it as follows:
<html lang="en-GB">
  ...
</html>
If you don’t set the language, Google and other search engines might find it difficult to crawl your site, or might take longer than anticipated.
Note that you can also set the language of subsections of your document by using the lang attribute on other elements, for example <span lang="fr">Bonjour</span>.
The attributes you use to set the language depend on the doctype of your document. For HTML use the lang attribute only, for XHTML 1.0 served as text/html or HTML5 polyglot documents use the lang and xml:lang attributes, and for XHTML served as XML use the xml:lang attribute only.
The simplest language tag value is a two-letter code such as en for English, but you can also combine multiple subtags with hyphens to give more detail where needed. For example, en-GB signals British English, and zh-hans signals Simplified Chinese. The language tags are defined in the IANA subtag registry. You can also search for subtags and check language tags using Richard Ishida’s Language Subtag Lookup tool, and find more information in the W3C article Choosing a Language Tag.
Setting your document’s character encoding
One feature HTML includes is an element for identifying the character encoding of your documents, which indicates the range of different characters you want to use. In HTML5 it looks like this:
<meta charset="utf-8">
Don’t worry too much about this for now. utf-8 is the universal character encoding which includes pretty much any character that you might want to use on a web page, from any common human language, so it is a good idea to declare this to make sure your HTML has full international capabilities. In addition, HTML5 will only recognize your character encoding declaration if you include it in the first 1024 bytes of the page. So putting it just below the <head> tag is fine. This is what all the examples in this article do.
It is, however, important to understand that just putting <meta charset="utf-8"> in your title element doesn’t magically convert your page to UTF-8 encoding, it just helps browsers know what to do with it. You need to actually save your document as UTF-8 as well, which most code editors will allow you to do these days.
For a gentle introduction to this concept, see the article Introducing Character Sets and Encodings.
Judging a document by its title
One of the most important elements in the head is the title. The text contained within the title is displayed by virtually all user agents/browsers in the browser application title bar (the bar bordering the top of the browser window). It is the first piece of content that web users see when they visit your site, and therefore very important. In addition, assistive technologies like screen readers give this as a first hint of what visitors can expect from the document, and a lot of search engines work similarly too, so your chances to get found on the web increase drastically when you use a good title that is both human-readable and contains the right keywords. Let’s take the following HTML document and open it in a browser.
<!DOCTYPE html>
<html lang="en-GB">
<head>
  <meta charset="utf-8">
  <title>I am a title example</title>
</head>
<body>
</body>
</html>
You’ll see that the text in the title is displayed in the bar above the browser navigation, as shown in Figure 1.

Figure 1: Displaying a title in a browser.
There are many tutorials on the Web about how to write good document titles, most of which are related to search engine optimization (SEO). Don’t go overboard and try to trick the search engines into showing an inflated number of search results. Just write a concise description of what the document is. “Breeding Dogs — Tips about Alsatians” is a lot more human digestible than "Dogs, Alsatian, Breeding, Dog, Tips, Free, Pet".
Adding keywords and a description
The next thing you should do might seem superfluous at first, as it is not directly visible to your visitors: adding a description and keywords. Both of these get added to the head inside meta elements, as shown in the following example taken from the Yahoo! Eurosport site.
<!DOCTYPE html>
<html lang="en-GB">
<head>
  <meta charset="utf-8">
  <title>Yahoo! UK & Ireland Eurosport - Sports News - Live Scores - Sport</title>
  <meta name="description" content="Latest sports news and live scores from Yahoo! Eurosport UK. Complete sport coverage with Football results, Cricket scores, F1, Golf, Rugby, Tennis and more.">
  <meta name="keywords" content="eurosport,sports,sport,sports news,live scores,football,cricket,f1,golf,rugby,tennis,uk,yahoo">
</head>
<body>
</body>
</html>
If you open this document in a browser you’ll not see anything in the body of the document; however, if you put the document online and search engines index it, the description will be displayed as the text below the link in search engine results, as shown in Figure 2.

Figure 2: Descriptions show up in search engine result pages.
This could be the crucial bit of information a potential visitor of your site is looking for and a good reason for him or her to click the link. Descriptions have another use too — some browsers show the description as extra information when you add the document to your favourites, as shown in Figure 3:

Figure 3: Descriptions show up in some browsers when you add the document as a favourite.
So although there is no obvious immediate benefit to adding meta descriptions, they do play an important role in the success of your document. The same, to a smaller degree, applies to the keywords you added.
Although years of abuse by spammers have made search engines not take keywords very seriously any more, they can still be a good tool to use if you want to quickly index a lot of documents without having to scan and analyze the content. You could use the meta keywords, for example, in a content management system by writing a script that indexes them and makes your search engine a lot faster. It doesn’t hurt to provide a way of finding documents without having to analyze their content. By adding some keywords in a meta element you leave yourself the option to have a clever and fast search for your sites should you want to create something like this in the future. Think of keywords as small bookmarks you leave in a massive book to make it easier for yourself to find a certain section immediately without having to read through whole chapters.
What about the looks? Adding styles
The next thing you can add to the head of a document is style rules, defined in the Cascading Style Sheets (CSS) specification. You can embed those directly in the head using a style element, like this.
<!DOCTYPE html>
<html lang="en-GB">
<head>
  <meta charset="utf-8">
  <title>Breeding Dogs—Tips about Alsatians</title>
  <meta name="description" content="How to breed Alsatians, tips on proper breeding and information about common issues with this breed.">
  <meta name="keywords" content="Dogs,Alsatian,Breeding,Dog,Tips,Free,Pet">
  <style type="text/css">
    body{
      background:#000;
      color:#ccc;
      font-family: helvetica, arial, sans-serif;
    }
  </style>
</head>
<body>
<p>Test!</p>
</body>
</html>
If you open this document in a browser it will show the “Test!” text in grey on a black background, and the font will be Helvetica or Arial, depending on what fonts your system has installed. The style element can also contain another attribute called media, which defines what kind of media will use these styles. For example, do you want these styles used when viewing the document on a computer screen, or on a handheld device, or when printed on paper? There are several media types to choose from, the most useful being:
screen— for displaying on monitors.print— to define what a printout of the document should look like.handheld— to define the look and feel of the document on mobile devices and other handheld devices.projection— for presentations done in HTML, as those supported by the Opera Show feature.
For example, if you want to override the colours used on the screen and use a larger font size to make the page better for printing, you can add another style block below the first one, with a media attribute of print, as seen below.
<style type="text/css" media="print">
  body{
    background:#fff;
    color:#000;
    font-family: helvetica, arial, sans-serif;
    font-size:300%;
  }
</style>
Now when you print this web page, the browser knows to use the print stylesheet for printing the document, and not the screen stylesheet. You might verify this by displaying the code in a browser and selecting print preview, as shown in Figure 4.
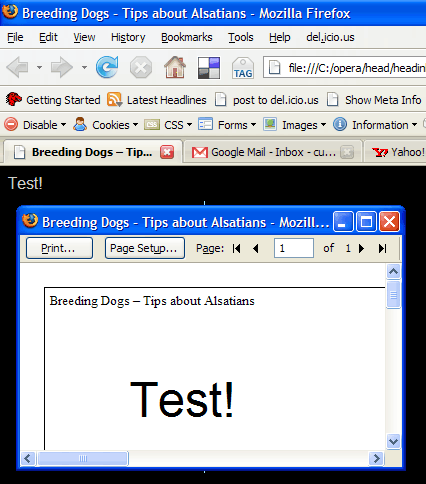
Figure 4: A print style sheet preview.
Adding dynamic features using JavaScript
Another thing you can add to the head is scripts that are executed by the browser, called “client side scripts” because they are executed on the user’s machine, not the web server. As you can see in this W3C article, JavaScript adds dynamic behavior to a static HTML document, such as animation effects, or form data validation, or other things that are triggered when the user performs certain actions.
You add JavaScript to a document using the script element. When a browser encounters one of these, it will drop everything, even pause parsing of the rest of the document, while it tries to execute the code inside it. This means that if you want to make sure that your JavaScript is available before the main document loads (which you nearly always do), you must add it to the head. For example, you can give the visitor a warning that a certain link will take them to another server with the following script.
<!DOCTYPE html>
<html lang="en-GB">
<head>
  <meta charset="utf-8">
  <title>Breeding Dogs—Tips about Alsatians</title>
  <meta name="description" content="How to breed Alsatians, tips on proper breeding and information about common issues with this breed.">
  <meta name="keywords" content="Dogs,Alsatian,Breeding,Dog,Tips,Free,Pet">
  <style type="text/css" media="screen">
    body{
      background:#000;
      color:#ccc;
      font-family: helvetica, arial, sans-serif;
    }
    a {color:#fff}
  </style>
  <style type="text/css" media="print">
    body{
      background:#fff;
      color:#000;
      font-family: helvetica, arial, sans-serif;
      font-size:300%;
    }
  </style>
  <script type="application/javascript">
    function leave(){
      return confirm("This will take you to another site,\n are you sure you want to go?")
    }
  </script>
</head>
<body>
Test!
<a href="http://dailypuppy.com" onclick="return leave()">The Daily Puppy</a>
</body>
</html>
If you open this example in a web browser and click the link, you’ll be asked to confirm your action. This is just a quick example of scripting and is far from best practice, but simply illustrates the functionality. Other tutorials will deal with JavaScript best practices and teach you JavaScript techniques in depth, but don’t worry about that for now.
Stop right there! Using inline CSS and JavaScript is not too clever!
Strong words, yes, but there is one thing you must remember when you build web sites: you should re-use your code as much as possible. Adding site-wide styles and scripts into each and every one of your pages doesn’t make much sense — on the contrary, it makes it harder to maintain a complete site and bloats the individual documents unnecessarily.
It is much better to put your styles and scripts in external files, and import them into your HTML files where needed, so you only need to update them in one place if changes need to be made. For JavaScript, you do this using script elements that have no script inside them, but instead link to an external file using a src attribute, as seen in the code below.
<!DOCTYPE html>
<html lang="en-GB">
<head>
  <meta charset="utf-8">
  <title>Breeding Dogs—Tips about Alsatians</title>
  <meta name="description" content="How to breed Alsatians, tips on proper breeding and information about common issues with this breed.">
  <meta name="keywords" content="Dogs,Alsatian,Breeding,Dog,Tips,Free,Pet">
  <style type="text/css" media="screen">
    body{
      background:#000;
      color:#ccc;
      font-family: helvetica, arial, sans-serif;
    }
    a {color:#fff}
  </style>
  <style type="text/css" media="print">
    body{
      background:#fff;
      color:#000;
      font-family: helvetica, arial, sans-serif;
      font-size:300%;
    }
  </style>
  <script type="application/javascript" src="leaving.js"></script>
</head>
<body>
Test!
<a href="http://dailypuppy.com" onclick="return leave()">The Daily Puppy</a>
</body>
</html>
It is not quite as simple with CSS, but is still fairly straightforward. Unlike the script element, the style element does not have a src attribute to point to your external file. Instead, external stylesheets are loaded using the link element — it has an href attribute that specifies an external CSS file to import, a rel attribute to specify the external file’s relationship to the current page (in this case, a stylesheet), and a media attribute to define if these styles should be used for screen, print, etc., similar to that described earlier. By putting both CSS and JavaScript into their own files, you can significantly reduce the size of the head, as shown below.
<!DOCTYPE html>
<html lang="en-GB">
<head>
  <meta charset="utf-8">
  <title>Breeding Dogs—Tips about Alsatians</title>
  <meta name="description" content="How to breed Alsatians, tips on proper breeding and information about common issues with this breed.">
  <meta name="keywords" content="Dogs,Alsatian,Breeding,Dog,Tips,Free,Pet">
  <link rel="stylesheet" type="text/css" media="screen" href="styles.css">
  <link rel="stylesheet" type="text/css" media="print" href="printstyles.css">
  <script type="application/javascript" src="leaving.js"></script>
</head>
<body>
Test!
<a href="http://dailypuppy.com" onclick="return leave()">The Daily Puppy</a>
</body>
</html>
Other benefits of keeping styles and scripts in their own files are:
- You make it both faster and easier for your site visitors, because although a few extra files are downloaded, the style and script information doesn’t need to be repeated in each web page file (it is just downloaded once, in the external script and style files), so each page file downloaded will be smaller. In addition, the CSS and JavaScript files will be cached (stored temporarily on your local machine), so that the next time you access the site, the files will be on your computer already, meaning they don’t need to be downloaded again.
- You greatly improve your ease of maintenance. The style and script for the whole site — which could be thousands of documents — are in one single location, so if you need to change something you only need to change one file, and not thousands.
Conclusion
In this article, we introduced the head element and some of its possible content. We will examine this important web page section further in the next tutorial, More about the HTML head.
See also
Exercise questions
- Why does it make sense to add a description in a
metaelement if it doesn’t get displayed on the screen? - What is the benefit of adding JavaScript to the
headof a document and not in thebody? - How can you benefit from your browser’s caching and what do you need to do to make it work for you?
- As search engines give the title of a document much love, wouldn’t it be useful to cram it full of relevant keywords? What are the downsides of this practice?
- As the title display can be a bit boring, wouldn’t it make sense to bold some words with a
belement? Is that possible?
Attributions
This content was originally published on DevOpera, Opera's Developer Network. .