Getting started with CSS
Summary
This guide covers the basic fundamentals of CSS, including CSS anatomy, selectors, and comments, and shows how to apply CSS rules to HTML content.
Introduction
This article covers the basics of CSS to help you get started with this powerful styling language. You will learn how to apply CSS to HTML documents, either as inline styles using style attributes, embedded styles in a <style> element in the document <head>, or as external files in their own documents.
You will also learn that the latter method — linking an external style sheet using a <link> element — makes the most sense in terms of maintenance and caching.
Additionally, an overview of the basic syntax of CSS is provided, including details about adding comments, selector types, and grouping selectors.
Review: What is CSS?
While HTML structures the document and tells browsers the function of page elements, CSS provides rules that instruct the browser how to display the elements — styling, spacing, coloring, etc. If HTML is the foundation and bricks that make up the structure of a house, CSS is the plaster and paint that decorate it.
CSS styles are applied using a system of rules. CSS rules:
- Identify which HTML elements should have styling applied
- Specify the “properties” (color, size, font, and other attributes) of the styled HTML elements
- Contain the values that control the appearance of each property
For example, a CSS rule might state:
I want to find every <h2> element on a page, and change the color of text surrounded by these tags to green.
or
I want to find every <p> element with a class attribute of author-name, set the background color to red, resize the text to twice the size of normal paragraph text, and add 10 pixels of spacing around it.
CSS is not a markup language like HTML, nor is it a procedural programming language like JavaScript. It is a declarative language that uses its own logic to identify and locate the page elements to which its style rules should be applied. Older technologies that defined interfaces before modern web development came along always mixed presentation and structure. As we’ve discussed in other tutorials, this is not a wise choice in an environment that changes as often as the web, which is why CSS was invented.
Defining style rules
Style rules can operate on different sets of items, selected in different ways. For example, they can be directly applied to HTML elements (body, article, nav, list, p, em, strong, etc.), or they can be applied to any elements with custom classes or IDs. This is the basic form:
selector {
  property1: value;
  property2: value;
  property3: value;
}
The pertinent parts are as follows:
- The selector identifies which HTML elements are affected by the rule, using actual element names such as
<body>, or other identifiers such asclassattribute values. When applied to the element names, selector is simply replaced by the name of that block. For classes, the syntax is.classname; for IDs,#idname. A more complete description comes later. - The braces contain the property:value pairs, which are separated from each other by semi-colons; the properties are separated from their respective values by colons.
- The properties define what you want to do to the selected element(s). These can affect attributes such as text color, background color, the position of the element on the page, font type, border color and thickness, and many other appearance and layout characteristics.
- The values are the settings that specify details of each property applied to elements, and the values are dependent on the property. For example, properties that affect color can use hexadecimal colors like
#336699, RGB values likergb(12,134,22)or color names likered,green, orblue. Properties that affect position, margins, width, height, and others can be measured in pixels, ems, percentages, centimeters, or other units.
Review this example:
p {
  margin: 5px;
  font-family: arial;
  color: blue;
}
The HTML element this rule affects is <p> — every <p> in the HTML document or documents that this CSS rule is applied to will display with these styles, unless they have more specific rules also applied to them (more about that later). The properties affected by this rule are the margins around the paragraphs, the font of the text inside the paragraph tags, and the color of the text. The margins are set to 5 pixels, the font is set to Arial, and the color of the text is set to blue.
A group of CSS rules can be added to a CSS document to form a style sheet. This is the most basic syntax when writing CSS rules. Some rules are more complex, but not much — one of the best things about CSS is its simplicity.
Whitespace in CSS
Whitespace in CSS works in exactly the same way as it does in HTML. Excess whitespace is completely ignored by the browser that renders the CSS, so in most cases you can add as much whitespace as you like to make the code easier to read. So this rule:
p {
  margin: 5px;
  font-family: arial;
  color: blue;
}
is functionally identical to this rule:
p {margin: 5px;font-family: arial;color: blue;}
There are a few exceptions where whitespace matters, for example, inside CSS function syntax. The property value url(background-image.png) would not work properly if you put a space between url and the opening parenthesis, as in url (background-image.png). But in general, as long as you include the necessary braces, colons, and semi-colons to separate the different parts, the browser understands the values you apply to properties.
CSS comments
One thing to know early on is how to add comments in CSS. As in any language, comments can help clarify the intent of the code. You add comments by enclosing them in /* and */ delimiters. Comments can span several lines. Browsers will ignore commented lines of text:
/* This is basic CSS rule syntax */
selector{
  property1: value;
  property2: value;
  property3: value;
}
You can add comments either between rules or inside the property block. For example, in the following CSS the second and third properties are enclosed inside comment delimiters, so they will be ignored by the browser. This is useful when you are testing the effect certain CSS rules have on your web page; just comment them out, save your CSS file, and reload the HTML page in a browser.
selector{
  property1: value;
  /*
  property2: value;
  property3: value;
  */
}
Grouping selectors
You can also group selectors. If you want to apply the same style to h1 and p, you can use the following CSS:
h1 {
  color: red;
}

p {
  color: red;
}
This, however, is not ideal coding practice, as you are repeating the same information. To remedy this, you can shorten the CSS by grouping the selectors together with a comma — the rules within the braces are then applied to both selectors:
h1, p {
  color: red;
}
Basic types of selectors
There are several different types of selectors, each matching a different part of the markup. The three types of selectors that you will encounter most often are:
Element selector
p {}
An element selector matches all the elements of that name on the page (<p> elements, in the case above). By specifying an HTML element (tag) as a selector, you can affect all page content that is marked up with that tag.
Class selector
.example {}
A class selector matches all elements that have a class attribute with the value specified, so the above would match <p class="example">, <li class="example">, or <div class="example">, or any other element with a class of example. Note that this type of class selector does not test for any specific element name.
ID selector
#example {}
An ID selector matches all elements that have an id attribute with the value specified, so the above would match <p id="example">, <li id="example">, <div id="example">, or any other element with an id of example. Note that ID selectors do not test for any element name, but IDs must be unique within each HTML page.
Combining selectors
You can join selectors together to define even more specific rules:
p.warning {}— matches all paragraphs with aclassofwarning.div#example {}— matches the element with anidattribute ofexample, but only when it is adiv.p.info, li.highlight {}— matches paragraphs with aclassofinfoand list items with aclassofhighlight.
Note that this does not mean you can use a shorthand for the definition of your elements in HTML. For example, your HTML paragraph will still have to be in the form <p class="classname">, but you can style it in your CSS with p.classname {}.
CSS shorthand
Another thing you will come across regularly in CSS is shorthand. It is possible to combine several related CSS properties together into one property to save time and effort. In this section we will look at the available types of shorthand. For more information, also see the CSS shorthand guide tutorial.
For example, this border property is shorthand:
border: 2px solid black;
It is equivalent to:
border-width: 2px;
border-style: solid;
border-color: black;
Comparing individual and shorthand values
Consider the following margin rule:
div.foo {
  margin-top: 1em;
  margin-right: 1.5em;
  margin-bottom: 2em;
  margin-left: 2.5em;
}
Such a rule could also be written as:
div.foo {
  margin: 1em 1.5em 2em 2.5em;
}
These types of property can take fewer than four values too, as follows:
- Same value applied to all four sides —
margin: 2px; - First value applied to the top and bottom, second to the left and right —
margin: 2px 5px;. - First and third values applied to the top and bottom respectively, second value applied to the left and right —
margin: 2px 5px 1px;.
There are a number of properties that work like this, including padding, margin and outline.
Making the choice to use a single property or a shorthand value
Shorthand margin and padding properties tend to get the greatest share of use, though there are situations in which shorthand properties are best avoided, or at least considered carefully, such as in the following situations:
- When a single margin needs to be set. In a situation where only one property needs to be set, the act of simultaneously setting multiple properties usually violates the KISS (Keep It Simple, Stupid) principle.
- The selector to which your properties apply is subject to many edge cases. When this happens — which it will, sooner or later — the inevitable heap of shorthand values can become hard to follow when it comes time to repair or alter your layout.
- The style sheet you’re writing will be maintained by people with limited CSS skills. If you can get them to read this article you may not need to worry about this scenario, but it is best not to make any assumptions.
- You need to supplant a value, to account for an edge case. This requirement is often a signal of a poorly designed document or style sheet, but those are hardly rare.
Applying CSS to HTML
The “C” in CSS stands for Cascading, which refers to the method by which style rules flow downward, or cascade. The order in which CSS rules are defined is important, and the methods you use to apply the rules defines their cascade sequence.
There are three ways to apply CSS to an HTML document: inline styles, embedded styles, and external style sheets. Unless you have a very good reason to use one of the first two, always go for the third option. The reason for this will become obvious soon, but here is an overview of the different options.
Inline styles
You can apply styles to a specific element using a style attribute, like this:
<p style="background:blue; color:white; padding:5px;">Paragraph</p>
Inside this attribute you list all the CSS properties and their values that you want to apply to the element. Each property/value pair is separated from the others by a semi-colon, and each property is separated from its value within each pair by a colon. If you open this example in a browser you will see that the paragraph with the style attribute is blue with white text and has a different size from the others, as shown in Figure 1.
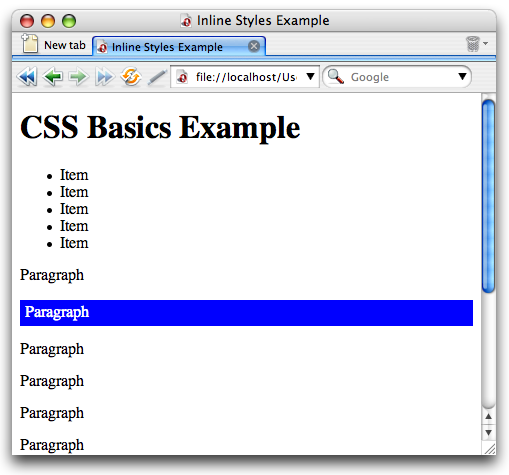
Figure 1: Opera shows the paragraph with the applied inline styles differently from the others.
The benefit of inline styles is that the browser will be forced to use these settings regardless of other applicable styles. That is, any styles defined in other style sheets or even embedded in the <head> of the document will be overridden by these styles.
The big problem with inline styles is that they make maintenance a lot harder than it should be. Using CSS is all about separating the presentation of the document from the structure, but inline styles are doing just the opposite — scattering presentation rules throughout the document. In addition to the maintenance issue, inline styles forfeit the advantage of the most powerful part of CSS: the cascade.
Embedded styles
Embedded styles are placed in the <head> of the document inside a <style> element, as in this example:
<style type="text/css" media="screen">
  p {
    color: white;
    background: blue;
    padding: 5px;
  }
</style>
Here, the defined styles get applied to all the paragraphs in the document, as shown in Figure 2.
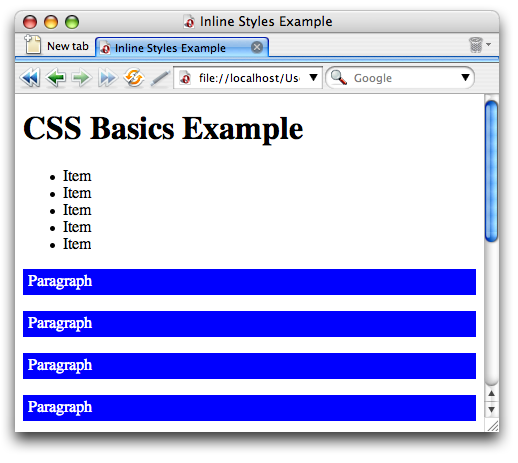
Figure 2: Opera shows all paragraphs with the styles defined in the embedded style sheet.
The benefit with embedded styles is that you don’t need to add a style attribute to each paragraph — you can style them all with a single definition. This also means that if you need to change the look and feel of all paragraphs, you can do it in one location. However, this is still limited to one document — what if you want to define the look of paragraphs for a whole site in one place? It is for this reason we use external style sheets.
External style sheets
External style sheets means putting all your CSS definitions in their own file, saving it with a file extension of .css, and then applying it to your HTML documents using a <link> element inside the document <head>. Let’s have a closer look at that <link> element:
<link rel="stylesheet" href="styles.css" type="text/css" media="screen">
The href attribute points to the CSS file, the media attribute defines which media should get these styles applied to it (screen in this case), and the type defines what the linked resource is (a file extension is not enough to determine that).
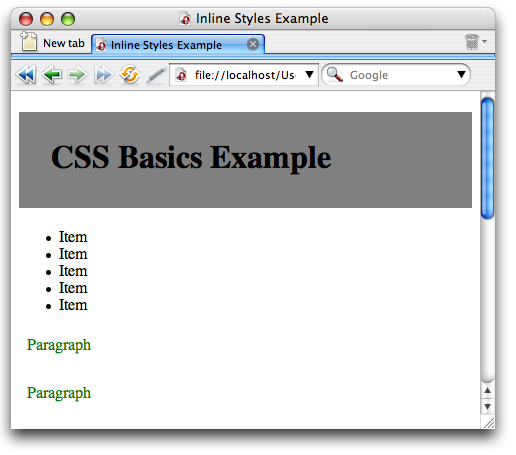
Figure 3: Opera shows the styles defined in the external style sheet when it is linked with a link element.
This is the best of all worlds: you keep your look and feel definitions in one place, which means that you can make site-wide changes by changing one file, and the browser can load that once and then cache it for all other documents that reference it, meaning less to download.
Importing stylesheets
There is actually one more way to import external style sheets into HTML files: the @import property. This is inserted into an embedded style sheet, in the same way as the embedded CSS shown above. The syntax looks like this:
<style type="text/css" media="screen">
  @import url("styles.css");

  /* ...other import statements or CSS styles could go here... */

</style>
If you use @import, it should always come first in an embedded style sheet. Also, you can specify that the imported style sheet be applied only to certain types of media by including the media type at the end of the import statement (this works in every browser except IE6 and below). The following does the same thing as the previous code example:
<style type="text/css">
  @import url("styles.css") screen;

  /* ...other import statements or CSS styles could go here... */

</style>
You may wonder, “Why on earth do I need another way to apply external style sheets to my HTML documents?” The answer is, you don’t really. We are mainly including information on @import here for the sake of completeness. There are a few advantages and disadvantages of using @import over <link> elements, but they are very minor, so it is really up to you which way you go. In general, the <link> element is the recognised best way to do things these days.
A couple of notes about @import:
- IE6 doesn’t support putting the media type at the end of the
@importline, so this is not a good way to go if you want to insert multiple stylesheets for different media. - You could argue that the code for multiple
@importstatements is smaller than the code for multiple<link>elements, but this is negligible.
Conclusion
You should now have a basic grasp of CSS rules, selectors, properties, and values. For more information on CSS, see the other tutorials in this section.
See also
Exercise Questions
- What are the benefits and problems of inline styles and how do you apply them to an element?
- What is a style rule? Describe the different components and syntax.
- Say you have a bunch of style rules, what do you need to do to make them into an external style sheet?
- What does the following CSS selector match:
ul#nav{}? - What is the benefit of grouping selectors?
- How can you define a print style sheet?